Overnight Oats

Easy overnight oats for kids, with picture steps for pouring, stirring and chilling.

Very EasyAges 5-8Adult supervision245 minMakes 2 adult portionsKids' score 4/5
Share this recipe

For grown-ups

Ingredients

AmountIngredient
100gporridge oats
200mlmilk
4 tablespoonsyogurt
2 tablespoonshoney or maple syrup
-favourite toppings

Equipment

No special equipment needed beyond a normal kitchen setup.

Step-by-step written method

1

Add oats

Put 100g porridge oats into a clean bowl, jar or lidded container. Choose a container with enough room for stirring; a wide jar, bowl or tub is easier for children than a narrow jar.

Child-friendly: Put oats in the bowl or jar.

Safety: Use a clean container and clean hands before preparing food.

Tip: A wide container is easier for children to stir.

2

Add milk, yogurt and honey

Add 200ml milk, 4 tablespoons yogurt and 2 tablespoons honey or maple syrup. Pour and spoon slowly so the container does not overflow. Set the container on a tray if spills are likely.

Child-friendly: Add milk, yogurt and honey.

Safety: Check milk, yogurt, oats and sweetener labels for allergens.

Tip: A tray underneath turns spills into an easy cleanup.

3

Mix and put the lid on

Mix well until the oats look evenly wet and there are no dry patches hiding at the bottom. Scrape around the edges, then put the lid on securely before chilling.

Child-friendly: Mix well. Put the lid on.

Safety: Keep ingredients away from the edge of the worktop while mixing.

Tip: Stir right down to the bottom so no dry oats are left.

4

Chill overnight

Put the oats in the fridge overnight, or for at least 4 hours, so the oats soften and thicken. Keep them chilled until you are ready to eat.

Child-friendly: Put it in the fridge overnight.

Safety: Keep the oats refrigerated until ready to eat.

Tip: Label the jar if several people are making breakfast.

5

Add toppings and eat

In the morning, add favourite toppings such as fruit, nuts, seeds, grated apple, sliced banana or raisins, then eat. Add crunchy toppings just before serving so they stay crisp.

Child-friendly: Add toppings. Eat.

Safety: Check toppings for allergens and choking risks, especially nuts, seeds and dried fruit.

Tip: Let children choose one fruit topping and one crunchy topping.

Why this works well for children

Overnight oats work well for children because the recipe is calm, visible and genuinely useful. There is no heat, no timer panic and no dramatic moment where everything has to happen at once, so children can concentrate on the sequence: oats, milk, yogurt and sweetener go in, everything gets stirred, the container waits in the fridge, and toppings finish it in the morning. It builds a different kind of confidence from a quick snack recipe. The child gets to make breakfast for future-them, notice that food can change while it rests, and practise independence while the adult quietly holds the hygiene, storage and allergen boundaries.

How to make this one go smoothly

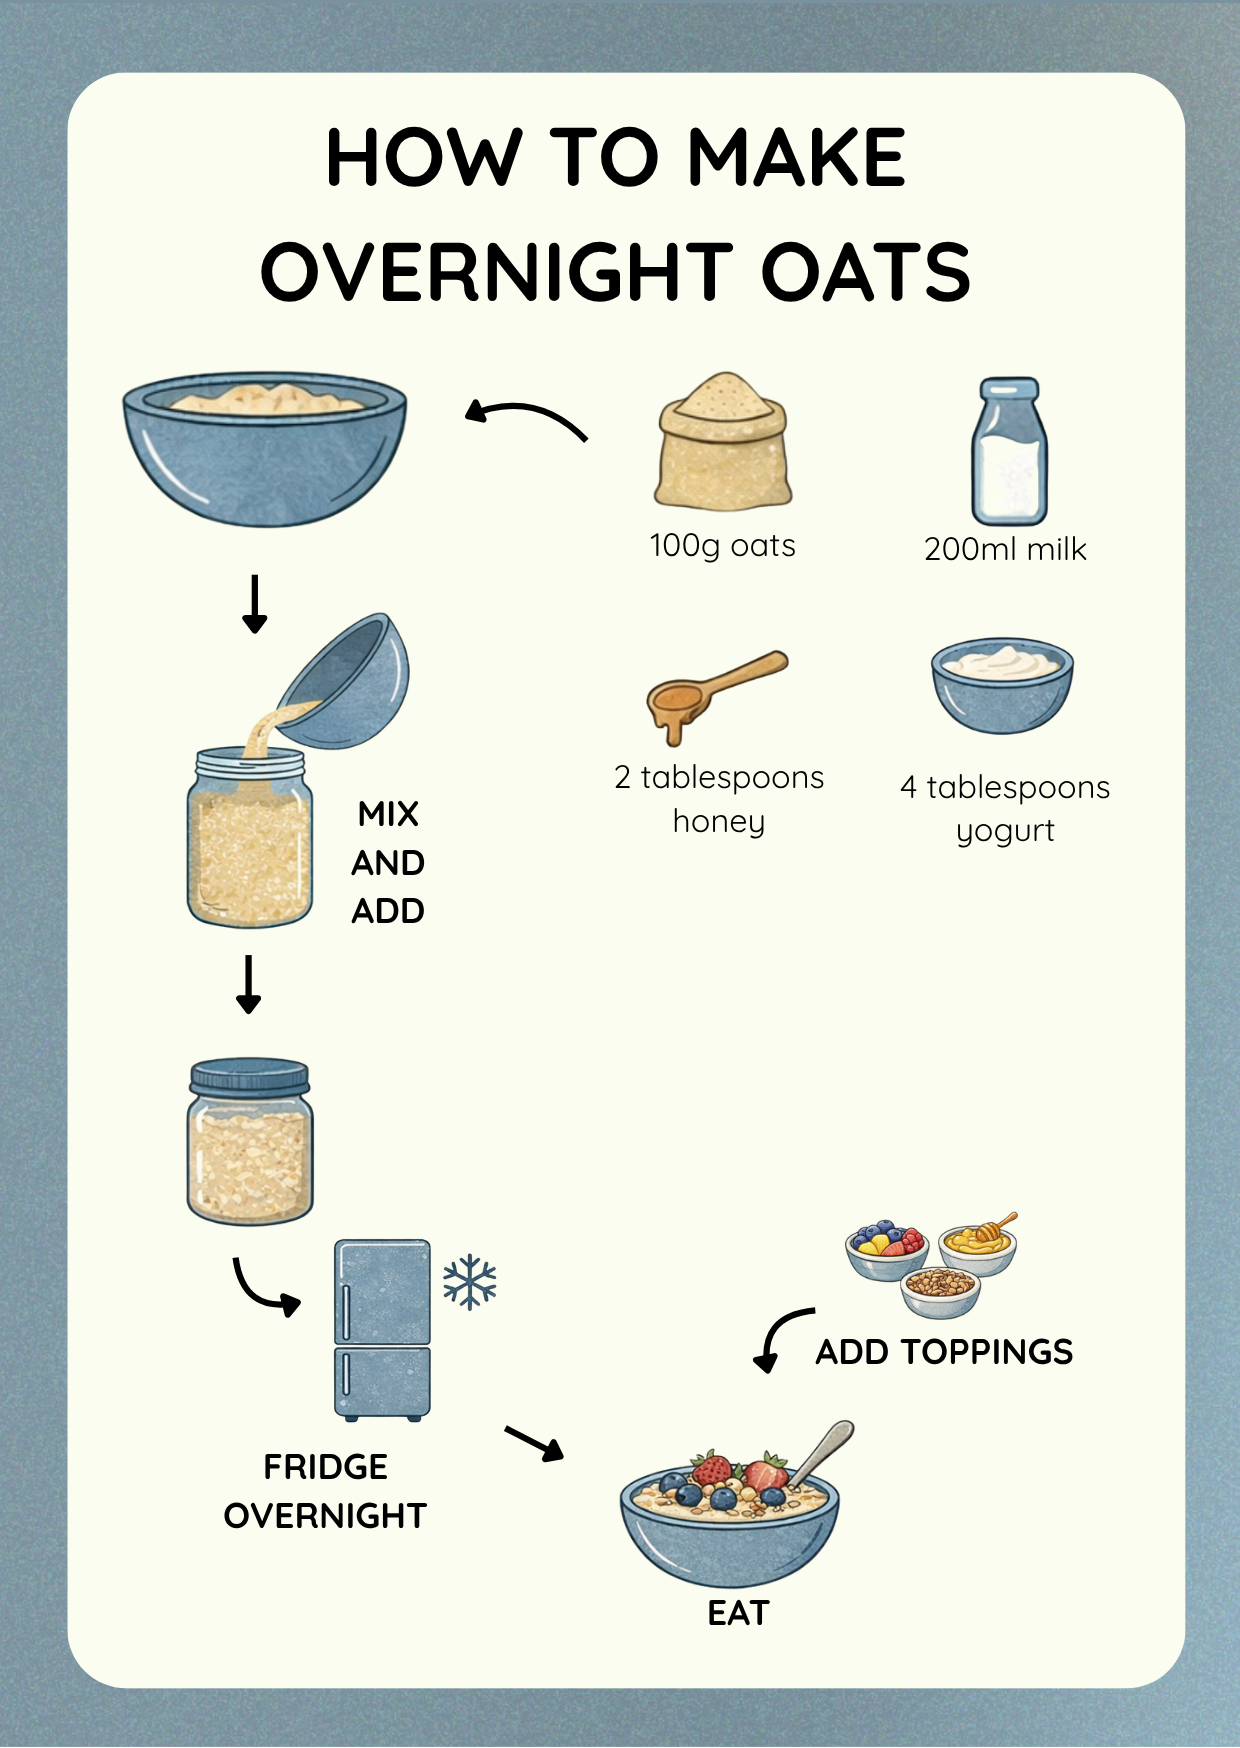
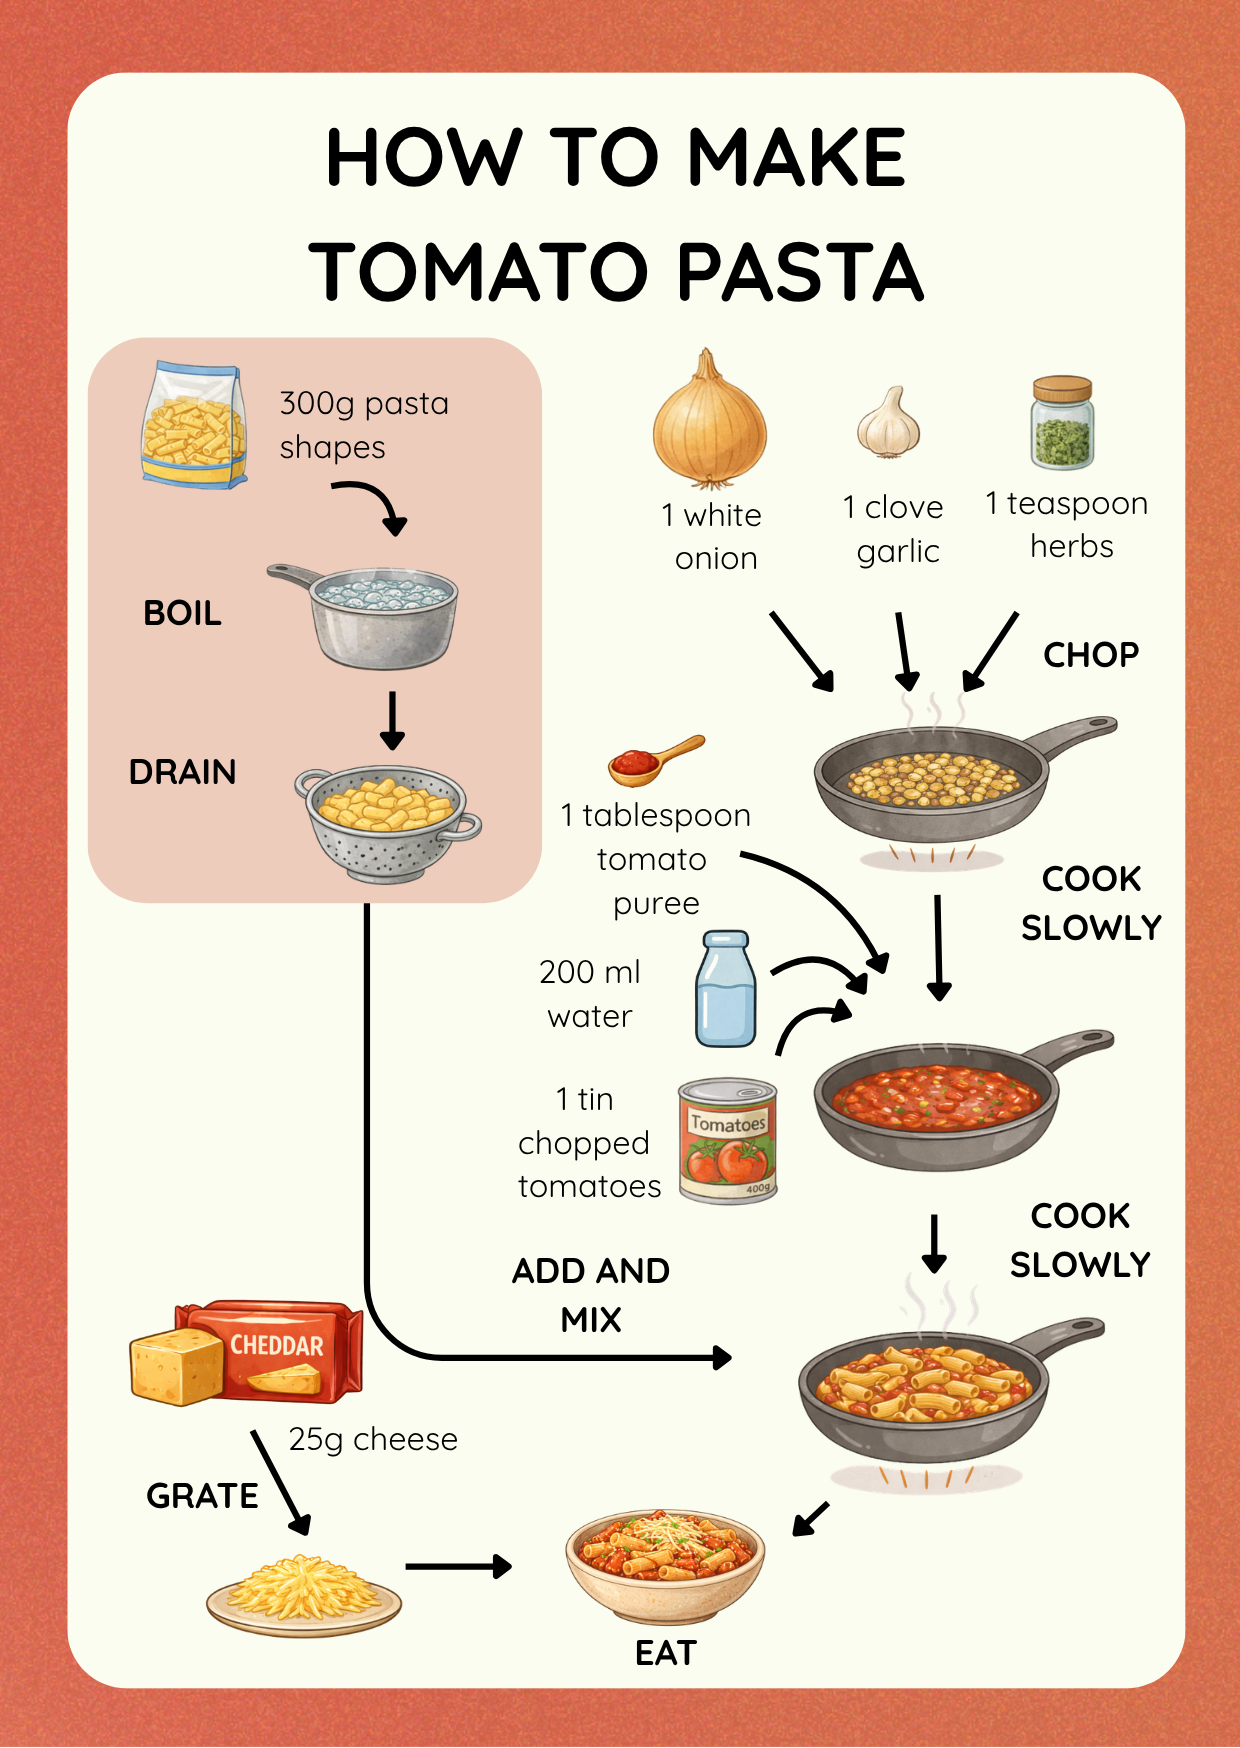
Overnight oats are easiest when you set them up like a small breakfast station. Put the oats, milk, yogurt, honey or maple syrup, spoon, container and lid within reach before you start. A tray underneath is worth it. It catches drips, gives the child a clear work zone, and makes cleanup feel less personal if something spills.

Choose the container for the child, not just for the fridge. A tall narrow jar looks neat in a photo, but it can be awkward for small hands to stir. A wider jar, bowl or lidded tub gives the spoon room to move and makes it easier to scrape down to the bottom where dry oats hide.

Pouring is often the place where a no-cook recipe suddenly feels harder than expected. If the milk bottle or yogurt tub is heavy, decant a small amount into something your child can manage. That keeps the independence in the recipe: they are still pouring and spooning, just with equipment that fits their hands.

The stirring step is the heart of the recipe. Encourage your child to look for dry patches and streaks of yogurt, then keep mixing until the oats look evenly wet. This is a gentle way to build judgement: they are not waiting for an adult to say “done”; they are learning what combined looks like.

The fridge step can feel anticlimactic, especially for children who want instant results. I would make the waiting part visible: put the lid on, say when you will eat it, and maybe let them choose a spot in the fridge. In the morning, remind them that the oats changed while they waited. That is the little bit of food magic in this one.

Keep toppings for the end unless you deliberately want them to soften. Fruit, seeds, raisins or a drizzle of extra honey can make the bowl feel personal. For younger children, check choking risks and allergens first, then let them choose one or two toppings so the final bowl still feels like theirs.

If the texture is not quite right in the morning, treat it as an adjustment rather than a failure. Too thick can be loosened with a splash of milk; too plain can be rescued with fruit; too cold can sit on the counter briefly while everyone gets spoons. Those tiny fixes are part of learning to cook, and this recipe gives you room to make them calmly.

What kids can do independently

  • Measuring ingredients
  • mixing
  • pouring
  • following simple steps
  • preparing food in advance

These are the child-led jobs to offer first. Keep the adult jobs separate, then hand over one small task at a time so the recipe still feels calm.

Nutrition information

Calories
270 kcal
Protein
10g
Carbohydrates
42g
Fat
6g
Fibre
4g
Sugar
14g
Salt
0.2g

Allergens, swaps and storage

Contains or may contain: dairy, gluten. Always check packet labels before cooking.

Simple substitutions usually work best when they keep the same texture and cooking time. Store leftovers safely once cool and follow normal food hygiene guidance.

What adults should supervise

Overnight oats are low-risk, but they are still real food your child is making for later. That is the supervision story here: the grown-up is not guarding a hot pan, but quietly helping with hygiene, dates, allergens and the fridge. It is a good recipe for practising independence without adding heat or time pressure.

The cautionary tale here is the narrow jar. A child can do everything "right" and still end up with oats on the worktop because the spoon has nowhere to move. A wide jar, bowl or tub gives them more success, and a tray underneath turns spills into a small reset rather than a kitchen mood shift.

I would also make the fridge step feel deliberate. The oats are not being put away because the cooking is over; the fridge is where the recipe keeps happening. That small reframe helps children understand waiting as part of making food, not as an adult interruption.

  • Clean hands, clean spoons and a clean container matter because the oats sit in the fridge for hours before eating. This is a quiet food-safety habit children can learn without any heat pressure.
  • Container choice is the main practical supervision point. A narrow jar can make a careful child look clumsy, so offer a wide jar, bowl or lidded tub with enough room for real stirring.
  • Pouring can wobble even in a no-cook recipe. Decant milk into a small jug, put the container on a tray, and let spills be wiped up calmly rather than treated as the recipe going wrong.
  • Check oats, milk, yogurt and toppings for allergens. Oats can be affected by gluten cross-contamination, and toppings such as nuts, seeds or dried fruit may need swapping or chopping.
  • Keep the oats chilled once mixed, and put them back in the fridge promptly if they are not being eaten straight away. The fridge step is part of the recipe, not just tidying up.
  • Honey is not suitable for babies under one year old. For younger children or shared family breakfasts, maple syrup, mashed banana or fruit can be an easier sweetener.

Parent FAQ

Are overnight oats a good independent recipe for children?

Yes. Overnight oats are one of the calmest ClearCook recipes for supported independence because there is no hob, oven or knife built into the main method. Children can make something useful for tomorrow, not just something to eat immediately, which can feel surprisingly grown-up. The adult role is still important, but it is mostly quiet: clean container, safe ingredients, fridge storage and topping checks.

What can children do mostly by themselves?

Many children can add oats, pour milk, spoon in yogurt, add honey or maple syrup, stir everything together, put the lid on and choose toppings in the morning. If pouring milk from a full bottle is awkward, decant a little into a small jug first so the child can still own the pour. A grown-up can check the amounts and dates without turning the recipe into an adult-led job.

What usually goes wrong with overnight oats?

The usual wobble is not danger so much as container choice and texture. A tall narrow jar looks tidy, but it gives small hands very little room to stir, so oats can go over the side while dry patches stay hidden at the bottom. A wider jar, bowl or lidded tub gives the spoon room to move, and a tray underneath turns spills into a small reset rather than a ruined mood.

Do overnight oats really need to chill overnight?

Overnight gives the softest texture, but four hours is usually enough if you are making them earlier in the day. The useful child-learning bit is that some recipes need waiting time: the oats do not look finished when they go into the fridge, but they change while they rest. For children who want instant results, naming the breakfast plan helps the waiting feel like part of the recipe rather than a disappointment.

What toppings work best for children?

Soft fruit, berries, sliced banana, grated apple, raisins, seeds or a small spoonful of nut butter can all work, depending on your household. Add crunchy toppings just before eating so they stay crisp, and keep the choice small if your child finds too many options overwhelming. For younger children, check choking and allergen risks before the toppings are already on the table.

What are the main allergens and supervision points?

Adult supervision is recommended mainly for hygiene, fridge storage, allergens and toppings. This recipe often includes oats, milk, yogurt and honey or maple syrup, so use household-safe swaps where needed and choose gluten-free oats if cross-contamination matters. Adults should check milk and yogurt dates, clean containers, honey guidance for very young children, and any nuts, seeds or dried fruit used at the end.

ClearCook Cooking Passport

Cooked it?

Mark this recipe as done and add it to your ClearCook Passport — a private record of every meal cooked.

View passport

Get this on a fridge card

Wipe-clean and ready for sticky little fingers. Start with a set for the kitchen, then add individual cards for recipes your child wants to repeat.