Chocolate Fridge Cake

Visual chocolate fridge cake for kids, with picture steps for crushing, mixing, pressing and chilling.

Very EasyAges 6-9Adult help needed135 minMakes 12 big piecesKids' score 5/5
Share this recipe
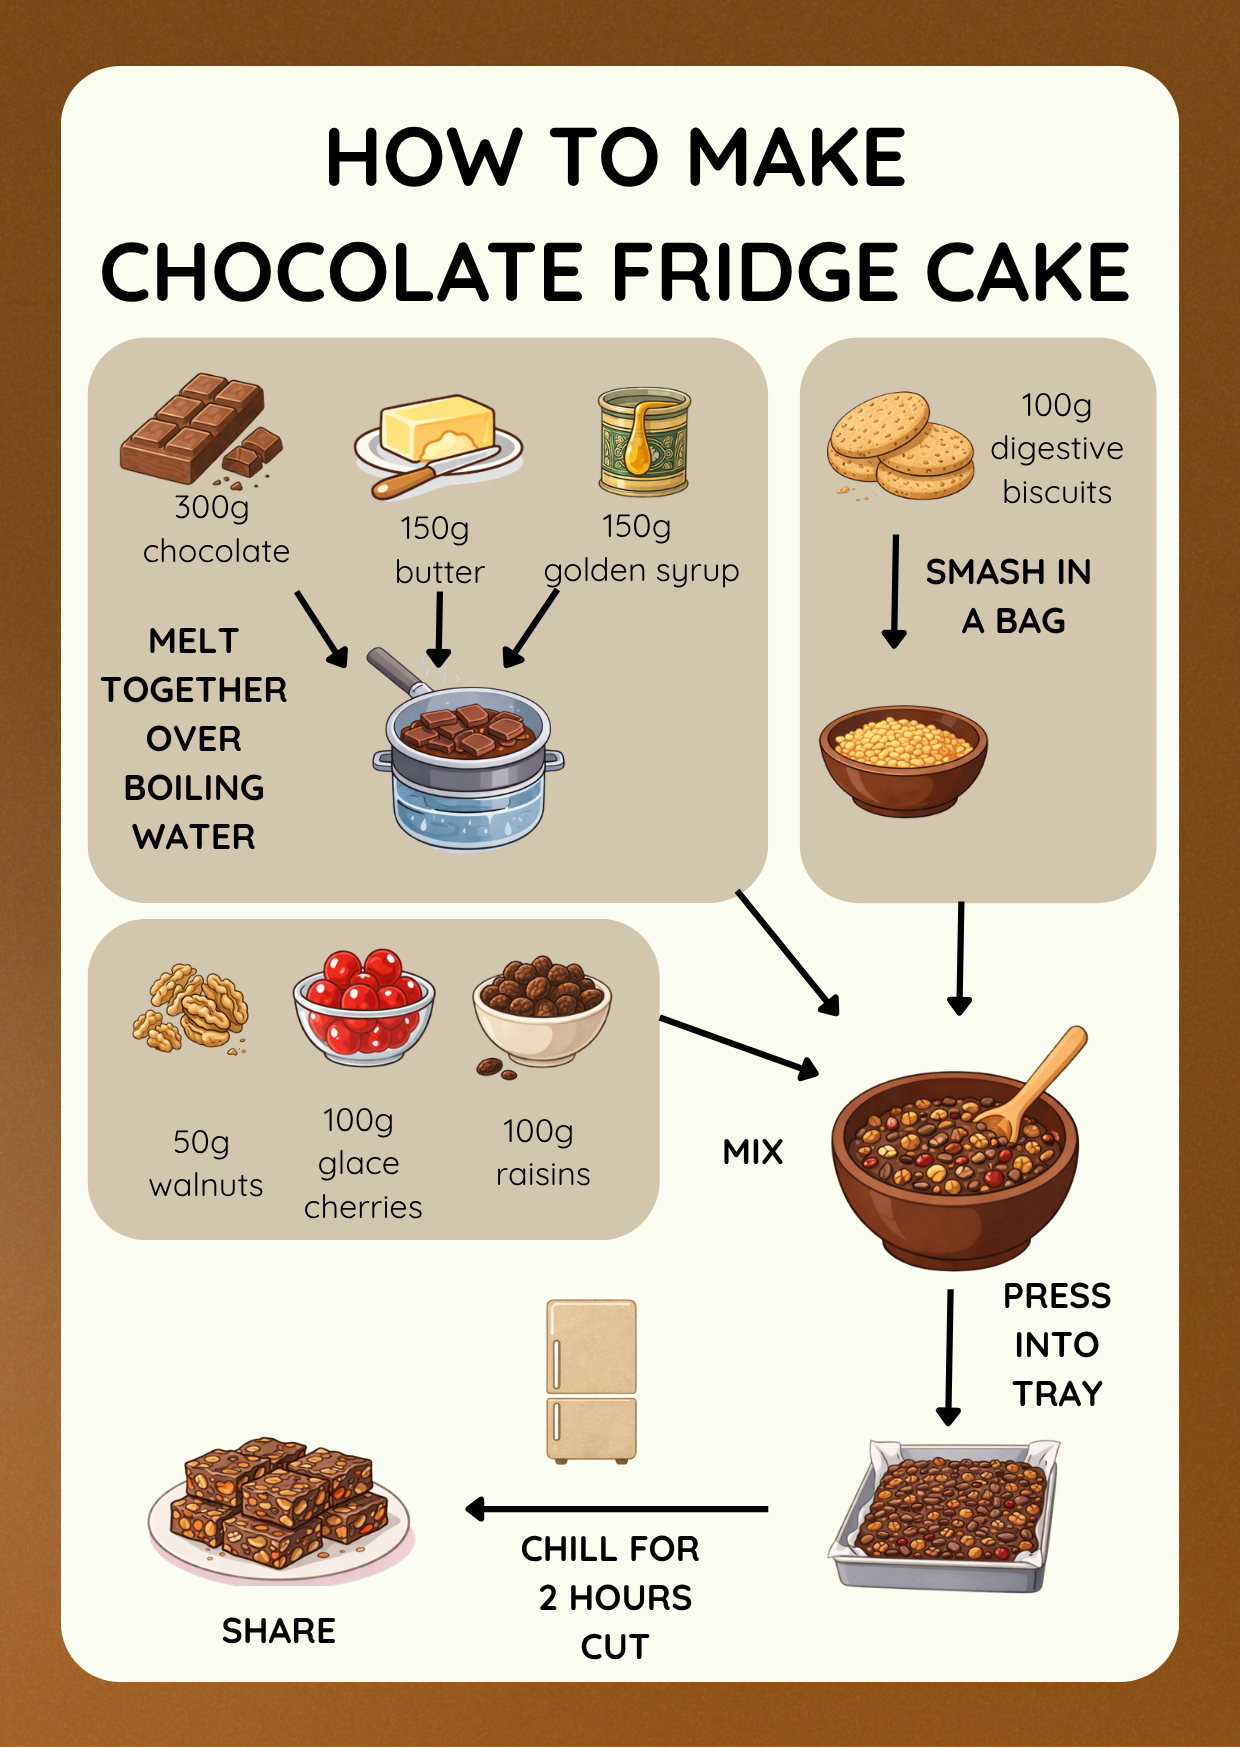
Chocolate Fridge Cake visual recipe card for kids with step-by-step picture instructions
ClearCook visual recipe card for Chocolate Fridge Cake, with picture-led steps children can follow with adult supervision.

For grown-ups

Ingredients

AmountIngredient
300gchocolate
150gbutter
150ggolden syrup
100gdigestive biscuits
50gwalnuts
100gglace cherries
100graisins

Equipment

No special equipment needed beyond a normal kitchen setup.

Step-by-step written method

1

Melt chocolate mixture

Adult help

Melt 300g chocolate, 150g butter and 150g golden syrup together gently over boiling water, or in short microwave bursts. Stir until smooth, then let the bowl cool slightly before children help combine it with the dry ingredients.

Child-friendly: An adult melts the chocolate mixture.

Safety: Adult help is needed for hot water, steam, hot bowls and melted chocolate.

Tip: Short microwave bursts reduce the chance of overheating or splitting the chocolate.

2

Crush biscuits

Put 100g digestive biscuits into a strong food bag and crush them into small chunks with a rolling pin or the base of a cup. Aim for small pieces, not fine dust, so the cake has texture.

Child-friendly: Smash biscuits in a bag.

Safety: Keep fingers clear while crushing and use a strong bag so crumbs stay contained.

Tip: A few bigger biscuit chunks make the fridge cake more interesting to bite.

3

Mix biscuits, fruit and nuts

Put the crushed biscuits into a large mixing bowl with 50g walnuts, 100g glace cherries and 100g raisins. Stir so the add-ins are spread through the biscuit pieces. Chop cherries or nuts smaller if needed.

Child-friendly: Mix biscuits, fruit and nuts.

Safety: Check nuts, dried fruit, biscuits and chocolate are suitable for your household.

Tip: Swap the add-ins for safe favourites such as marshmallows, seeds or extra biscuits.

4

Stir in chocolate mixture

Adult help

Pour the melted chocolate mixture over the biscuit, fruit and nut mixture. Stir slowly with a sturdy spoon or spatula until everything is coated and there are no dry pockets at the bottom of the bowl.

Child-friendly: Add chocolate mixture and stir.

Safety: The melted mixture and bowl may still be warm.

Tip: Scrape right down to the bottom so every piece gets coated.

5

Press into tray

Spoon the mixture into a lined tray or tin, then press it down firmly with the back of a spoon or spatula. Push it into the corners and smooth the top so it sets into neat pieces.

Child-friendly: Press mixture into the tray.

Tip: Firm pressing helps the slices hold together once chilled.

6

Chill for 2 hours

Put the tray into the fridge and chill for at least 2 hours, or until the fridge cake is firm all the way through. Overnight chilling gives the cleanest slices.

Child-friendly: Chill for 2 hours.

Safety: Keep the tray flat in the fridge and chill until fully set before cutting.

Tip: Use the waiting time to tidy up and choose a plate for sharing.

7

Cut into pieces

Adult help

Lift the chilled fridge cake from the tray if the lining allows, then cut into small pieces with a sharp knife. Adult help is usually needed because chilled fridge cake can be firm and rich.

Child-friendly: An adult cuts it into pieces.

Safety: Adult help is needed for cutting firm fridge cake with a sharp knife.

Tip: Small squares are easier to eat because fridge cake is rich.

8

Share

Put the pieces on a plate and share. Keep leftovers chilled in a covered container so the chocolate stays firm.

Child-friendly: Share the fridge cake.

Safety: Check pieces are a safe size for the children eating them.

Tip: Keep leftovers in the fridge.

Why this works well for children

Chocolate fridge cake works well for children because it is no-bake but still full of real transformation. Biscuits become chunks, dry add-ins become a colourful mix, melted chocolate coats everything, and the fridge turns a sticky tray into firm slices. Children get very satisfying jobs: crushing, pouring, stirring, pressing, waiting and sharing. The adult can hold the hot melting and sharp cutting boundaries while the child owns the messy, visible middle of the recipe.

How to make this one go smoothly

Chocolate fridge cake goes most smoothly when the tin is lined before anything sticky happens. It is a small grown-up setup job that saves a lot of scraping later. Put out a large mixing bowl, sturdy spoon, strong food bag, rolling pin or cup, and the lined tray before you start melting chocolate.

Keep the melting step calm and adult-led. If using a bowl over boiling water, talk about steam as the hazard, not just the hob. If using the microwave, use short bursts and stir between them. Either way, let the mixture cool slightly before children help with the next stage.

Crushing biscuits is a great child job because it is physical and forgiving. Aim for small chunks rather than powder. If the bag starts to split or crumbs escape, pause and double bag it rather than turning the moment into a scolding. A little mess is expected here.

Add-ins are where this recipe can flex. Walnuts, glace cherries and raisins match the card, but you can swap for safe favourites such as marshmallows, seeds, extra biscuits or different dried fruit. Do the allergen thinking before the bowl is full and sticky.

Once the chocolate goes in, use slow, strong stirring. Children may stir only the top and leave dry biscuit underneath, so show them how to scrape around the sides and right down to the bottom. The goal is not neatness; the goal is everything coated.

Pressing is the step that makes or breaks the slices. Use the back of a spoon or spatula and press firmly into the corners. Children often pat the top lightly and call it done, but firm pressure helps the cake hold together after chilling.

The waiting is part of the recipe. Two hours in the fridge is enough for setting, while overnight gives cleaner slices. When it is time to cut, let the adult handle the knife and then hand the recipe back for sharing. That final plate of squares is a lovely payoff for the patience.

What kids can do independently

  • Crushing
  • measuring
  • melting
  • mixing
  • combining ingredients
  • pressing into a tin
  • patience while chilling
  • cutting

These are the child-led jobs to offer first. Keep the adult jobs separate, then hand over one small task at a time so the recipe still feels calm.

Nutrition information

Calories
220 kcal
Protein
3g
Carbohydrates
20g
Fat
14g
Fibre
2g
Sugar
14g
Salt
0.2g

Allergens, swaps and storage

Contains or may contain: dairy, gluten, nuts. Always check packet labels before cooking.

Simple substitutions usually work best when they keep the same texture and cooking time. Store leftovers safely once cool and follow normal food hygiene guidance.

What adults should supervise

Chocolate fridge cake feels wonderfully child-led because there is no oven, but the melting step still needs a clear adult boundary. A bowl over boiling water can look calm while the steam and chocolate mixture are hot. I would name that at the start: the adult melts, then the child gets the crushing, mixing and pressing jobs.

The other moment to name is cutting. A child may have pressed the tray beautifully and waited for it to set, then naturally want to finish the job. Chilled fridge cake can be firm, and a sharp knife is usually needed, so make cutting an adult or shared job before the tray comes out of the fridge.

The nice handoff is sharing. Once the pieces are cut, the child can arrange them on a plate, choose who gets one, and see that the sticky mixture they pressed into the tray has become a real dessert.

  • Melting chocolate, butter and syrup is the adult-led step. Hot bowls, steam and melted sugar can burn, so children can watch or stir later once it is safe.
  • Crushing biscuits is satisfying but can scatter crumbs. Use a strong bag, a steady surface and a tool the child can control, such as a rolling pin or cup base.
  • Nuts, dried fruit, chocolate and biscuits all need allergen checks. Swap walnuts or cherries before you start if they are not right for your household.
  • The chocolate mixture can still be warm when poured into the bowl. Use a sturdy spoon and check the bowl is not too hot for children to hold or steady.
  • Pressing needs firmness. Help children push the mixture into the corners and flatten the top so it sets into pieces rather than falling apart.
  • Cutting chilled fridge cake is usually an adult job. It can be firm and rich, so use a sharp knife and cut small pieces.
  • Keep the fridge cake chilled until serving, and return leftovers to the fridge so the chocolate stays firm.

Parent FAQ

Is chocolate fridge cake a good no-bake recipe for children?

Yes. It is a brilliant child-led recipe because there is no oven and the changes are very visible: biscuits become chunks, fruit and nuts get mixed through, chocolate coats everything, and the tray turns firm in the fridge. The adult still needs to handle melting and cutting, but children can own a lot of the middle of the recipe.

What can children do mostly by themselves?

Many children can crush biscuits in a bag, add raisins, cherries and safe nuts or swaps to the bowl, stir the dry mixture, help combine everything once the chocolate has cooled a little, press the mixture into the tin, and put the finished pieces on a plate. If nuts are not suitable, the child can still choose safe add-ins such as extra biscuits, seeds, marshmallows or dried fruit.

Where does this recipe usually wobble?

The mixture can get sticky, heavy and a bit chaotic once the melted chocolate goes in. A too-small bowl makes stirring frustrating, and gentle pressing will not hold the slices together later. Use a large bowl, a sturdy spoon and a lined tin, then show children that firm pressing is part of the recipe, not just tidying the top.

How should adults handle the melting step?

Melting is the grown-up boundary here. Whether you use a bowl over boiling water or short microwave bursts, the bowl and mixture can get hot and steam can surprise children. Let them watch, stir later if it is safe, and explain that their main jobs start once the chocolate mixture is ready to combine.

Why does it need to chill before cutting?

Chilling is what turns a sticky bowl mixture into sliceable fridge cake. Two hours is the minimum on the card, but overnight gives cleaner slices if you have time. This is a useful patience lesson because children can see that waiting changes the texture, not just the clock.

What are the main allergens and supervision points?

Adult help needed is recommended. Check chocolate, butter, golden syrup, biscuits, walnuts, dried fruit and any swaps for dairy, gluten, nuts and household allergens. Adults should handle melting, hot bowls, steam, cutting the firm cake, and judging safe piece sizes for the children eating it.

ClearCook Cooking Passport

Cooked it?

Mark this recipe as done and add it to your ClearCook Passport — a private record of every meal cooked.

View passport

Get this on a fridge card

Wipe-clean and ready for sticky little fingers. Start with a set for the kitchen, then add individual cards for recipes your child wants to repeat.